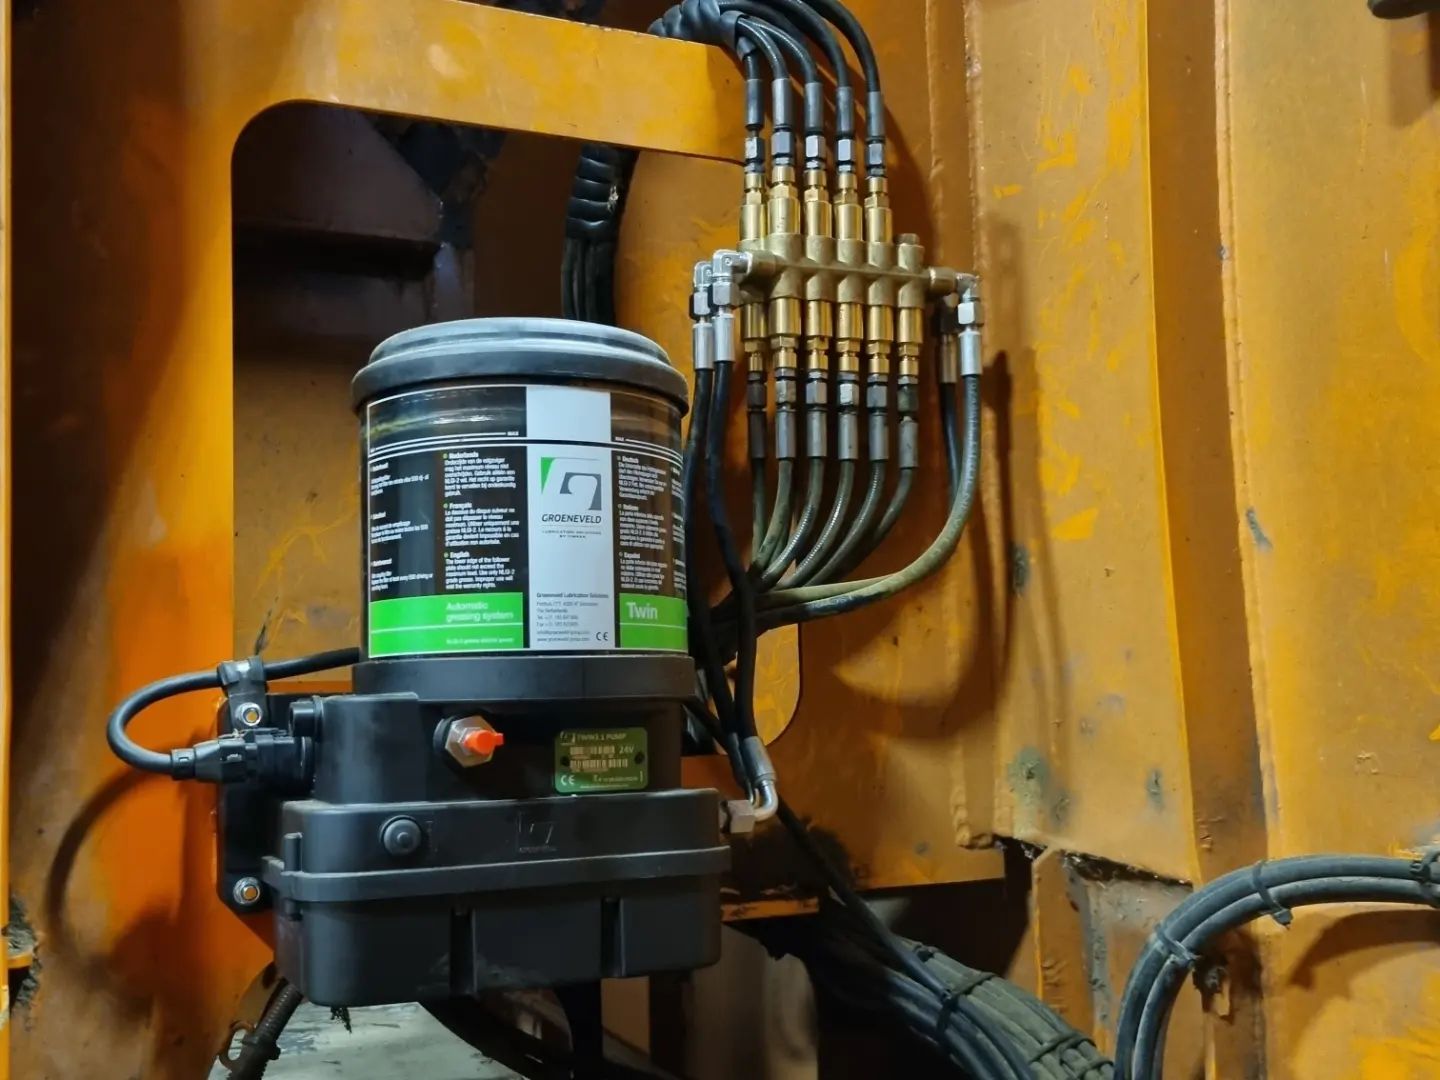
Most Common Error Codes

E11
No Pressure Line A
Blocked line, air in the system, or dry grease lines. Bleed the line and run a manual cycle.

E12
No Pressure Line B
Same as E11 but affecting the second line. Check routing, fittings, and grease delivery.

E15
Low Level
Refill the reservoir. If full, inspect the level sensor for misalignment or disconnection.
All Error Codes
 Connecting to pump
When the ignition is switched ON, the pump’s 3-digit LED display will show a rotating clock pattern. This indicates the system is successfully connecting to the control unit.
After about 10 seconds, the display will change to show the selected greasing duty mode, and the green LED will turn on to confirm the pump is ready to operate.
 +
+  Light duty - Greasing mode with long intervals
This display indicates the system is in light duty mode. It’s designed for machines that require less frequent greasing. The system applies longer intervals between greasing cycles and delivers a reduced amount of grease.
Use this mode for equipment operating in cleaner environments or with lower grease consumption.
 + Medium duty - Greasing mode with medium intervals
This mode indicates the system is in medium duty mode, which is the standard operating setting. It applies regular intervals between greasing cycles and delivers a balanced amount of grease.
Ideal for general machinery usage under normal working conditions.
 + Heavy duty - Greasing mode with short intervals.
This mode indicates the system is in heavy duty mode, designed for machines that operate in harsh conditions or have high grease consumption.
The system applies shorter intervals between greasing cycles and delivers a larger amount of grease to protect critical components.
 + Pump performs a single cycle test
*Pump performs a single cycle test (LED flashes slow). (See paragraph 3.2 Twin 3 Manual).
 +
+  Pump performs multiple cycle test
Pump performs multiple cycle test (LED flashes fast). (See paragraph 3.3 Twin 3 General Manual).
To stop this function, turn off power to reset.
 + Automatic cycles
During normal operation, the LED display shows a greasing cycle in progress. The pump delivers grease according to the selected duty mode (Light, Medium, or Heavy) and pauses between cycles based on pre-set intervals.
 + Minimum Level
The system has detected a low grease level in the reservoir. This warning signals that the reservoir needs to be refilled soon to avoid interruption in automatic greasing cycles.
If greasing continues without refilling, it may trigger E15 – Empty Reservoir, which disables the pump.
 +
+  System error. Duty cycle selection blocked.
The system has detected an unresolved error condition that prevents the user from selecting a greasing duty cycle.
You must resolve the active fault code (e.g. E11–E15) before the system will allow changes to greasing mode.
Refer to Twin-3 display error codes in the manual for instructions on clearing the fault and restoring full functionality.
+
E11 due to successive no pressure in line-A
Cause
- Pressure switch did not close during a greasing cycle in primary Line A
- Possibly due to:
- Broken or damaged Line A
- Internal bypass in metering unit
- Air trapped in pump or primary Line A
Solution
- Inspect Line A and connectors; replace or repair as needed
- Use Uni-GINA or PC-GINA to check timer activation settings
- Refill reservoir fully until air is purged (see section 4.5.2)
- Bleed pump and lines (see sections 4.3 & 4.4)
+
E12 due to successive no pressure in line-B
Cause
The pressure switch did not close during a greasing cycle in primary line-B. Possibly caused by:
- Broken or damaged primary Line B
- Metering unit causes internal bypass
- Air trapped in pump and/or primary line-B
Solution
- Check condition of primary lines and connectors. Replace or repair when necessary.
- Refer to “Procedure when internal system leak is suspected” (Twin 3 Manual, page 43).
- Refill the reservoir until it is bled. See section 4.5.2 “Filling the reservoir”.
- Bleed the pump and primary lines. See sections 4.3 and 4.4 “Bleeding pump & system”.
 +
E13 due to successive pressure before cycle in line-A
+
E13 due to successive pressure before cycle in line-A
Cause
The pressure switch in primary line-A was still closed at the beginning of the cycle.
This may be due to:
- Wiring harness or connector issue
- 5/2-way valve not switching properly
- Faulty pressure switch
Solution
- Check wiring harness and connector points – repair or replace if damaged.
- Test the valve manually using Uni-GINA or PC-GINA; replace if not operating correctly.
- Inspect and replace the pressure switch if necessary.
 +
E14 due to successive pressure before cycle in line-B
+
E14 due to successive pressure before cycle in line-B
Cause
The pressure switch in primary line-B was still closed at the outset of the cycle.
This may be caused by:
- Wiring harness interrupted at joining point
- 5/2-way valve not operating properly
- Faulty or broken pressure switch
Solution
- Check all wiring and connectors; replace or repair as needed.
- Use Uni-GINA or PC-GINA to manually test the valve. Replace if malfunctioning.
- Inspect and replace the pressure switch (valve) if necessary.
+  E15 due to empty reservoir
Cause
Greasing cycles could not be completed because the grease reservoir was empty. This disabled the pump.
May be caused by:
- Maximum number of cycles exceeded with low-level switch activated
- A combination of low-level switch activation and a prior pressure error (Line A or B)
Solution
- Refill the reservoir. Follow Twin 3 Manual section 4.5.2 “Filling the reservoir”.
- After refilling, bleed the system. See section 4.3 “Bleeding the pump”.
 +
E20 due to successive low supply voltage
+
E20 due to successive low supply voltage
Cause
The supply voltage dropped below the required operating level during one or more greasing cycles.
- Weak battery or poor electrical connections
- Undersized power supply cable or excessive voltage drop
Solution
- Check battery voltage and charging system
- Inspect power cables for damage, corrosion, or poor connections
- Use appropriate cable thickness to prevent voltage loss
 + E21 due to successive faulty pressure switch circuit
Cause
The system has detected a fault in the pressure switch circuit.
- Wiring to the pressure switch may be loose or damaged
- Pressure switch itself may be faulty
- Other electrical interference or wear over time
Solution
- Inspect the pressure switch wiring and connectors for any faults or signs of damage
- Test the pressure switch and replace if necessary
- Check continuity and electrical function with diagnostic tools (e.g., Uni-GINA or PC-GINA)
 + E23 due to successive pump over current
Cause
Control unit detected a too high cur- rent draw to pump motor and aborted the attempted cycle, caused by:
a) Short circuit in wiring of motor.
b) Short circuit in motor.
c) Drive shaft blocked.
d) Extreme low working temperature in combination with a grease not suitable for these conditions.
e) The "pump motor current limit" setting not suitable for the extreme low working temperature.
Solution
a) Check the wiring of motor. Replace or repair when necessary.
b) Check motor on wiring faulty, check the resistance of the motor. Replace when necessary.
c) Check the drive shaft on blocking. Replace or repair when necessary.
d) Replace the grease in the reservoir and bleed the system with a suitable grease for the obtained working conditions.
e) Increase the "pump motor current limit" parameter setting but only after checking whether the vehicle wiring and fuse can handle a higher setting.
 + E22 due to successive pump open loads
Cause
The system has detected an open circuit on the pump output.
- Loose or disconnected wiring to the pump
- Connector pins not seated correctly or damaged
- Internal fault within the pump unit or wiring harness
Solution
- Inspect the pump power connections and wiring harness for damage or disconnection
- Ensure all connectors are firmly seated and free from corrosion
- Test the pump circuit using a diagnostic tool (e.g., Uni-GINA or PC-GINA)
 + E24 due to successive valve 1 open loads
Cause
Control unit detected a too low current draw to first coil of the 5/2-way valve in combination with initial “system on pressure before cycle” error, caused by:
a) Interrupted wiring of the coil.
b) Defective coil.
Solution
a) Check wiring. Replace or repair when necessary.
b) Check coil on wiring faulty, check the resistance of the coil. Replace or repair when necessary.
 + E25 due to successive valve 1 over current
Cause
Control unit detected a too high cur- rent draw to 5/2-way valve in combi- nation with initial “system on pressure before cycle” error, caused by:
a) Short circuit in wiring of the coil.
b) Defective coil
Solution
a) Check wiring. Replace or repair when necessary.
b) Check coil on wiring faulty, check the resistance of the coil. Replace or repair when necessary.
 + E31 due to successive valve 2 open loads
Cause
Control unit detected a too high cur- rent draw to 5/2-way valve in combi- nation with initial “system on pressure before cycle” error, caused by:
a) Short circuit in wiring of the coil.
b) Defective coil
Solution
a) Check wiring. Replace or repair when necessary.
b) Check coil on wiring faulty, check the resistance of the coil. Replace or repair when necessary.
 + E32 due to successive valve 2 over current
Cause
Control unit detected a too high cur- rent draw to 5/2-way valve in combination with initial “system on pressure before cycle” error, caused by:
a) Short circuit in wiring of the coil.
b) Defective coil.
Solution
a) Check wiring. Replace or repair when necessary.
b) Check coil on wiring faulty, check resistance of the coil. Replace or repair when necessary.
 +
E50 due to a communication error with the control unit
+
E50 due to a communication error with the control unit
Cause
a) No communication between display & control unit.
b) No supply voltage at the pump.
c) Defective Twin-3 display.
Solution
a) Check the purple communication wire no. 6 between display and pump (pump connector pin no. 6). Repair when necessary.
b) Check the fuse and red power wire no.1 to pump connector no.
1 and the black ground wire no.
2 to the pump connector no. 2. Replace or repair when necessary.
c) When no issues found as stated in solution A or B, replace display.
 + E51 due to a parameter checksum error
Cause
Control unit encountered corrupted parameters during power up and restored the production default settings.
Solution
Replace control unit.
 +
E52 due to a low Real Time Clock (RTC) battery
+
E52 due to a low Real Time Clock (RTC) battery
Cause
Real time clock battery low
(2,2 V) at the control unit.
Solution
Replace control unit.
 +
E53 Real time clock (RTC) faulty
+
E53 Real time clock (RTC) faulty
Cause
Control unit encountered a corrupted real time clock causing the events and errors to be stored with in accurate time & dates caused by:
- RTC battery empty
Solution
Replace control unit.
 +
E52 due to unknown cause
+
E52 due to unknown cause
This error indication shows when pump motor is disconnected due to a number of successive errors but no additional info available on the error cause. Twin pumps manufactured before September 2010 cannot provide such information to the Twin- 3 display.
Cause
Control unit encountered an unknown cause due to:
a) Display connected to a Twin-2 control unit (or a Twin-3 control unit with SW version 1063 or lower). Such a control unit does not supply additional info on the cause of the error like the Twin-3 pump does since SW version 1078
b) An error cause that is not listed in the table.
Solution
a) Replace control unit for one with a SW version 1078 or higher when the additional error information is required.
b) Replace control unit.
Troubleshooting FAQ
Persistent E11 or E12 errors often mean trapped air wasn’t fully cleared, or there’s an internal leak in the metering units. Fully bleed both lines (see manual section 4.5.2) and check for damaged fittings. Also verify the pressure switch is functioning correctly and pump is making correct pressure.
Push test button on pump for 1-2 seconds, that should reset the controller to green. If not, refer to specific fault code for resolution steps before tyring again.
It’s strongly advised to refill the grease reservoir as soon as possible. Ignoring the low-level warning may lead to a full stop with E15.
If you’ve ruled out air and blockages but still get pressure-related errors (E11–E14), test the pressure switch using a Uni-GINA or PC-GINA diagnostic tool. Also inspect the wiring harness for breaks or corrosion.
If the fault persists after multiple resets, it's likely that the root issue hasn't been fixed. A reset only clears the error temporarily — the system will show red again if it detects the same fault condition during the next cycle.
Here's what to check next:
- Double-check the original fault code (e.g. E11, E12, E15) and follow all recommended steps, including bleeding lines and checking for blockages.
- Inspect wiring and connectors — especially around the pressure switch and level sensors. Loose, corroded, or broken connections are a common cause.
- Run a manual cycle to see if grease is being delivered and pressure builds properly.
- Review your timer settings using Uni-GINA or PC-GINA — incorrect intervals can cause the system to fault repeatedly.
If you're based in New Zealand, contact our team and we’ll help you get back up and running.
If you're outside New Zealand, please contact your local Groeneveld distributor or installer for support.
E50 is a communication error between the pump and the display unit. It usually means the cable is loose, damaged, or there's a fault in the display or control board.
Try this:
- Check the communication cable connections and look for damage or corrosion
- Power off the unit for 30 seconds, then restart
- If using Uni-GINA, test if the pump responds
If the error returns:
- NZ customers: contact our team
- Outside NZ: contact your Groeneveld distributor or installer
Products
Download Twin 3 Manual
Book an on-site service
Our NZ technicians can come to you. Book a service and we’ll get your system sorted.